Designing Your Dream IKEA Kitchen: A Comprehensive Guide
Creating your perfect kitchen can feel overwhelming, but with the right approach, it can be an exciting journey. Whether you’re starting from scratch or looking to revamp your existing space, this guide will walk you through a three-step process that I use for clients to create their new IKEA kitchens.
I’ll show you how I blend IKEA products with custom elements for a unique look and highlight the top IKEA kitchen accessories that maximize functionality.

Step 1: The 3-Step Process for Creating an IKEA Kitchen
Step 1: Assess Your Space
Before designing, examine your kitchen space closely. Measure its dimensions, including the location of doors, windows, and existing plumbing.
Consider how you will use the space—do you cook frequently with elaborate preparations, entertain guests, or need a family-friendly area? Understanding your needs helps me determine what’s vital in your new kitchen design.
Step 2: Current Layout and Can It Be Modified
Below are the most popular kitchen layouts in most homes. Based on the budget, I can help determine if the current layout can be modified or made more efficient.
- One Wall: Usually found in a very small home. Prioritizing smaller appliances with base drawers will maximize storage. Are there adjacent walls that can house a refrigerator or pantry or peninsula?
- L-Shaped: How big is the L shape? Depending on its size, you could add an island. If it’s small, prioritize the appliance layout for enough countertop space.
- Galley: Most smaller kitchens have this layout. What appliances are on the outer wall? Can it be torn down all the way or partially to open it up to the rest of the house?
- U-Shaped: This layout has a lot of space. Is it being used efficiently? You should have room to upgrade appliances to a built-in cooktop/wall oven. Is part of the U a whole wall, or could it be a half-wall with a peninsula?
- Island: If you already have an island, is it the correct size for the kitchen? Do you have ample room around it without doors or appliances hitting each other when they’re open? Can the island be upgraded with more cabinet storage?
Step 3: Plan The Work Triangle
The work triangle consists of the sink, stove, and refrigerator. I aim to position these three elements in a triangular layout to enhance workflow and efficiency.
It’s always important to ensure there’s enough space between each point to allow for easy movement while cooking, whether it’s one cook or two at the same time.
Blending IKEA Products with Custom Elements for a Unique Look
One of the best parts about designing an IKEA kitchen is the ability to mix and match products with custom elements to create a one-of-a-kind space. Here are some tips for achieving that perfect blend:
- Custom Cabinet Fronts: While IKEA offers a variety of cabinet styles, consider adding custom cabinet fronts for an upgraded look. Over nine different companies offer fronts that fit IKEA’s cabinet frames.
- Open shelving: Shelving instead of wall cabinets can add a personalized touch and is especially effective for showcasing unique dishware or decorative items.
- Durable Countertops: Pair IKEA cabinets with custom butcher-block, granite, or quartz countertops. I wouldn’t go with any IKEA-stocked countertops.
- Personalized Hardware: Replace standard cabinet knobs and pulls with unique hardware that reflects your style. Vintage or artisanal pieces can add a distinctive flair to your kitchen.
- Accent Walls: Incorporate a custom backsplash or accent wall using materials that create a focal point that complements your IKEA kitchen. Many people are starting to incorporate stone countertop material into their backsplashes, but tile is always an easy way to add color or geometric flair to your wall.
The Top IKEA Kitchen Accessories That Maximize Functionality
To make the most of your IKEA kitchen, I always incorporate as many of these top items as possible to enhance functionality and organization:
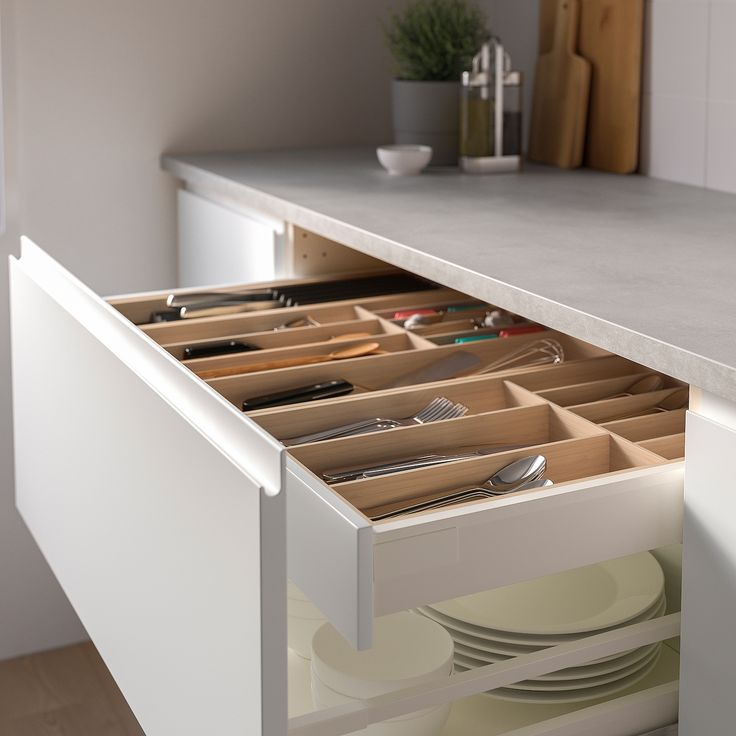
- Drawers: For your base cabinets, use as many drawers as possible. Your sink and cooktop cabinet can even have pull-out drawers.
- Pull-Out Pantry: Maximize vertical space with a pull-out pantry unit that provides easy access to canned goods, spices, and snacks.
- Lazy Susans: Perfect for corner cabinets, lazy Susans allow you to access items that might otherwise be difficult to reach easily.
- Blind Corners: If you have a small kitchen with a blind corner, don’t waste that space. Use a carousel or pull-out shelf organizer inside the cabinet. If your kitchen is large, use two adjacent drawers instead.
- Door Fronts over Appliances: Cover that dishwasher with a door front to enhance your sleek kitchen design.
- Lighting: Install LED lighting under upper cabinets to illuminate work surfaces. Install dimmable recessed lights to create a warm ambiance in your kitchen. Add drawer lights to make things easily seen, even at night.
- Pull-Out Trash Cabinets: Keep your kitchen tidy with pull-out waste bins that fit seamlessly into your cabinetry, making trash disposal convenient.
Conclusion
These are the steps that I have learned to help my clients create their perfect IKEA kitchen. If you’re tired of wondering where to start or trying to master the IKEA planner by yourself, please know that I can help you through the process.
IKEA makes wonderful kitchen products that don’t cost a crazy amount of money. No, I don’t get paid by IKEA to endorse their products; I really think they are the best kitchen cabinets for the money!
Ready to start your kitchen transformation? Contact me today for expert guidance and assistance in bringing your vision to life!